
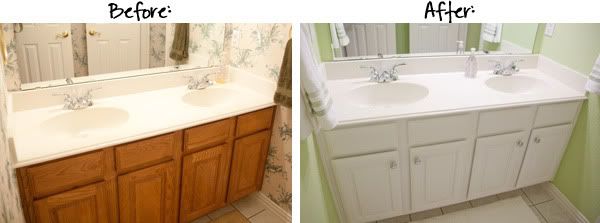
Here's a list of the things we did to transform this hall bathroom from 1990's yuck to a bathroom fit for two little boys. It took some time, and definitely some elbow grease, but this makeover was not expensive. The only things we didn't do were replace the tile floor and frame the vanity mirror...both decisions based on budget.
Sand, prime, and paint the cabinets.
Add cabinet knobs to the cabinets.
Change out the light fixture above the mirror.
Remove the wallpaper.
Texture the walls (to match the rest of the house).
Paint the walls (twice, unfortunately.)
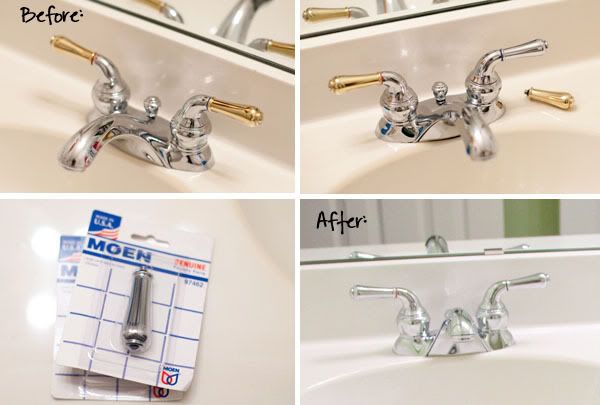
Change out handles on faucets and tub.
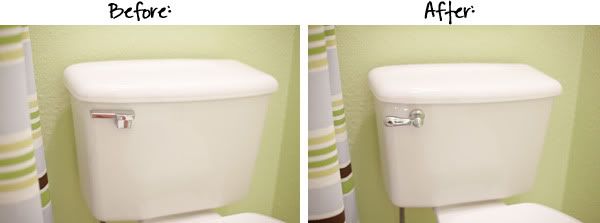
Change out toilet handle.
Change out hardware - towel rings, toilet paper holder, towel hooks.
Hang pictures.
New shower curtain and bath mats.
And now for some "nuts and bolts" details:
Taking down the wallpaper: I think I've said this before, but I've taken down a lot of wallpaper...unfortunately. So, I feel somewhat qualified to recommend a method. And that would be a steamer. If you can't borrow one like I have, it is still probably worth the $50 that they cost at Lowes or Home Depot. You have to score the wallpaper first. Not too hard and not too lightly. The idea is to get through the entire wallpaper layer but not to score the drywall underneath. This takes some practice to get the feel for how hard to press. Scorers can also be found at Lowes or Home Depot for less than $5.
After scoring, steam the wallpaper thoroughly in sections and peel it away with your hands and a scraper, if necessary. Usually, the first layer will come off easily and it is the papery under-layer that will take some time to get off. Much like peeling off a sticker when it doesn't come off cleanly...if that makes sense. I have tried other methods too...chemical sprays, spraying hot water...but neither one is as quick and effective as a steamer.
Sanding, priming, and painting the cabinets: I made the choice to do this instead of replacing the cabinets to save money, obviously. I am really pleased with the results. I did a lot of research online before tackling this project because I wanted to make sure it was done right and would look good. And I would be amiss if I didn't mention here that this would never have been accomplished without the efforts of Casey, my mom, my mother-in-law, Donna, and Casey's grandaddy. They all did a lot of work for me on these cabinets since I couldn't work with the toxic oil-based paint.
I, however, did the sanding. I used a small electric sander that we had bought for previous projects and it saved my life. It made such short work of sanding those cabinets. I did have to do some of the smaller crevices by hand and I hated that part! You really only have to sand off the glossy finish, though, so it wasn't too bad. When I was done sanding, I used tack cloth to remove all the sanding particles from the wood.
Then we (they) primed the cabinets and frame with an alklyd primer and let it dry/cure for the full time recommended on the paint can before adding the paint. Then they finished the cabinets with two coats of alklyd paint. This type of paint is an enamel and has a hard, durable finish. They let the first coat dry completely before adding the second. Casey's grandaddy actually sprayed all of the doors for us, which gives the smoothest and most professional-looking finish. They really look great.
Casey drilled the holes for the knobs after I had marked the spot with a template. You can buy a template at a hardware store, but I made my own. Most knobs are about 2.5-3 inches down from the top of the cabinet. The reason you should make a template to mark each door instead of hand measuring each one is simple...human error. It happens. And if it does, you are stuck because there's no going back when you make a hole in your cabinet door.
Sand, prime, and paint the cabinets.
Add cabinet knobs to the cabinets.
Change out the light fixture above the mirror.
Remove the wallpaper.
Texture the walls (to match the rest of the house).
Paint the walls (twice, unfortunately.)
Change out handles on faucets and tub.
Change out toilet handle.
Change out hardware - towel rings, toilet paper holder, towel hooks.
Hang pictures.
New shower curtain and bath mats.
And now for some "nuts and bolts" details:
Taking down the wallpaper: I think I've said this before, but I've taken down a lot of wallpaper...unfortunately. So, I feel somewhat qualified to recommend a method. And that would be a steamer. If you can't borrow one like I have, it is still probably worth the $50 that they cost at Lowes or Home Depot. You have to score the wallpaper first. Not too hard and not too lightly. The idea is to get through the entire wallpaper layer but not to score the drywall underneath. This takes some practice to get the feel for how hard to press. Scorers can also be found at Lowes or Home Depot for less than $5.
After scoring, steam the wallpaper thoroughly in sections and peel it away with your hands and a scraper, if necessary. Usually, the first layer will come off easily and it is the papery under-layer that will take some time to get off. Much like peeling off a sticker when it doesn't come off cleanly...if that makes sense. I have tried other methods too...chemical sprays, spraying hot water...but neither one is as quick and effective as a steamer.
Sanding, priming, and painting the cabinets: I made the choice to do this instead of replacing the cabinets to save money, obviously. I am really pleased with the results. I did a lot of research online before tackling this project because I wanted to make sure it was done right and would look good. And I would be amiss if I didn't mention here that this would never have been accomplished without the efforts of Casey, my mom, my mother-in-law, Donna, and Casey's grandaddy. They all did a lot of work for me on these cabinets since I couldn't work with the toxic oil-based paint.
I, however, did the sanding. I used a small electric sander that we had bought for previous projects and it saved my life. It made such short work of sanding those cabinets. I did have to do some of the smaller crevices by hand and I hated that part! You really only have to sand off the glossy finish, though, so it wasn't too bad. When I was done sanding, I used tack cloth to remove all the sanding particles from the wood.
Then we (they) primed the cabinets and frame with an alklyd primer and let it dry/cure for the full time recommended on the paint can before adding the paint. Then they finished the cabinets with two coats of alklyd paint. This type of paint is an enamel and has a hard, durable finish. They let the first coat dry completely before adding the second. Casey's grandaddy actually sprayed all of the doors for us, which gives the smoothest and most professional-looking finish. They really look great.
Casey drilled the holes for the knobs after I had marked the spot with a template. You can buy a template at a hardware store, but I made my own. Most knobs are about 2.5-3 inches down from the top of the cabinet. The reason you should make a template to mark each door instead of hand measuring each one is simple...human error. It happens. And if it does, you are stuck because there's no going back when you make a hole in your cabinet door.
Changing the toilet handle: This is something I did in our downstairs powder bathroom too and although it is a very small detail, I think it makes the toilet instantly look more modern and the handle match the other hardware in the bathroom. So for about $10, I did the same thing in the boys' bathroom. This is something anyone can do. The instructions are simple and you do not need any plumbing experience or tools. I did it by myself in about 5 mintues.
Changing the handles on the faucets: The reason I wanted to do this is because the previous faucets were a combination of polished brass and chrome finishes. Kind of dated. Instead of spending money (and time) to replace the faucets entirely, I noticed that the brass handles screwed off separately. Then, I went online and looked on Moen's website to see if I could get replacements in a different finish. It turns out I could.
And even better, I searched a little more and found them much cheaper at another online store than at the manufacturer's website. But they were the exact same part. Each handle cost $15 and as I said before, just screwed on. Perfect. This totally transformed the look of our perfectly functional existing faucets.
And even better, I searched a little more and found them much cheaper at another online store than at the manufacturer's website. But they were the exact same part. Each handle cost $15 and as I said before, just screwed on. Perfect. This totally transformed the look of our perfectly functional existing faucets.
Other notes: I got the light fixture at Home Depot, the shower curtain from Target, the frames from Aaron Brothers (on sale), and the towels at Bed, Bath, and Beyond with my 20% off coupons. I had photos printed (8x10) that I had taken of Ethan in the bath to put in the frames and made the "B is for Boat" in the other frame in Photoshop and printed it off on cardstock at home.

Whew. That's pretty much it. I am so glad it's done and I love it.


4 comments:
Wow!!! I SOOO impressed, as always, with your work! I know it feels like slow progress to you, but it seems so fast for us! That is two bathrooms down! We are thinking of bathroom remodel this summer, but ours will be WAY more involved! Maybe we will just stick with painting the play room...
That is awesome! We're doing some of that too - repainting furniture/redecorating, and it's so satisfying when you do it yourself! I love your end result!
I love the changes. Such a cute bathroom. You feel such a sense of accomplishment when you're done. We remodeled one of our guest bedrooms in March, adding crown molding and all, and I'm so pleased with the result. It's amazing how just a little bit of sweat, some new paint and new hardware can give a room a brand new look.
I love it! Looks absolutely fabulous! Totally worth the effort!
Post a Comment