
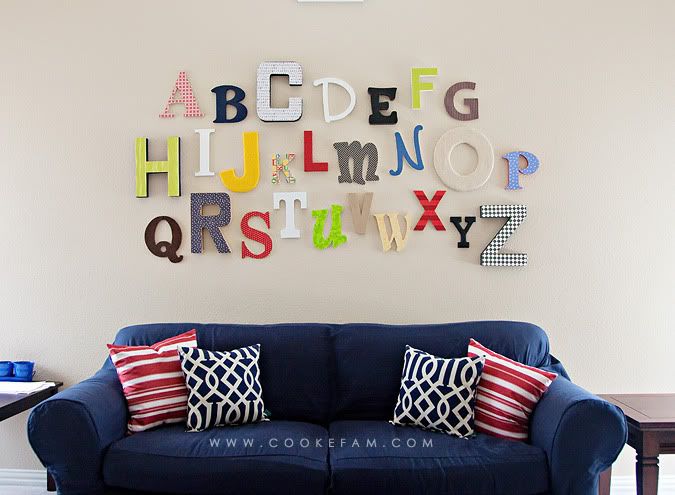
This post should answer those questions I've received about the alphabet wall in the playroom. Here's my method...
I mentioned that this was a fun project...and it was. But it took some planning and prep work before I was able to put it up on the wall like that.
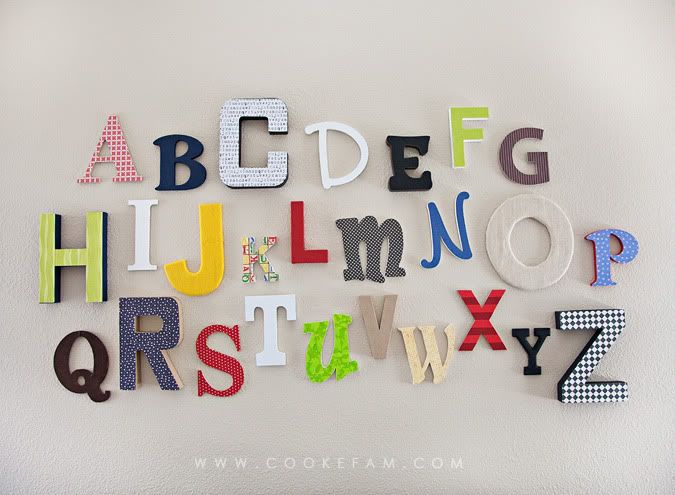
First of all, I purchased the letters at Michael's, JoAnn's, and Hobby Lobby. I just got several different styles and sizes, keeping in mind what the letters would look like right next to each other.
I mentioned that this was a fun project...and it was. But it took some planning and prep work before I was able to put it up on the wall like that.
First of all, I purchased the letters at Michael's, JoAnn's, and Hobby Lobby. I just got several different styles and sizes, keeping in mind what the letters would look like right next to each other.
After gathering all my letters, the next thing I did was lay them out in three rows on my dining room table. This was purely to figure out what treatment each letter would get. I kept a few of the letters just as I had bought them. Every other one got either paint, scrapbook paper or fabric on it. I placed the paint or paper/fabric under each letter as I made decisions so I could see how it would all look together and what pattern or color would be next to another one.
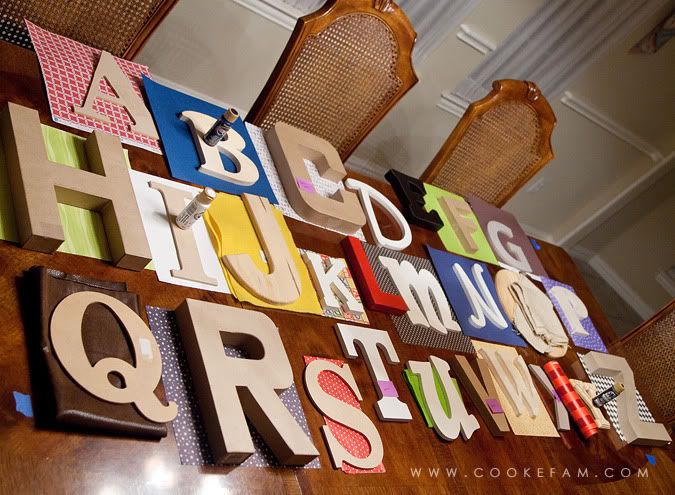
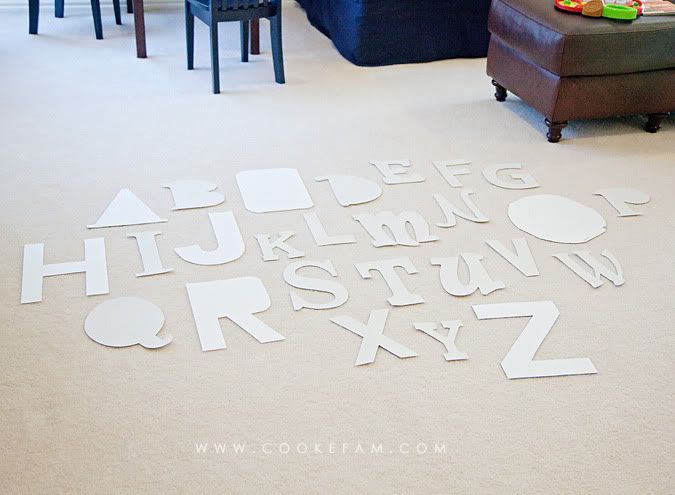
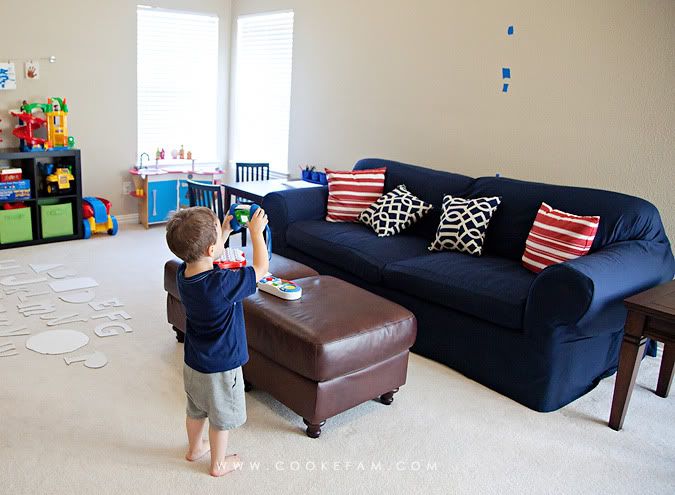
At this point, it took me a few days to complete all the letters...I did not do them all at once. Then, I laid out all of the letters (in several different arrangements) on the floor until I liked how it looked. This part actually took longer than it seemed like it would. After I was satisfied with the placement of each letter in the grouping, I took a photo of it so I could reference it, if necessary.
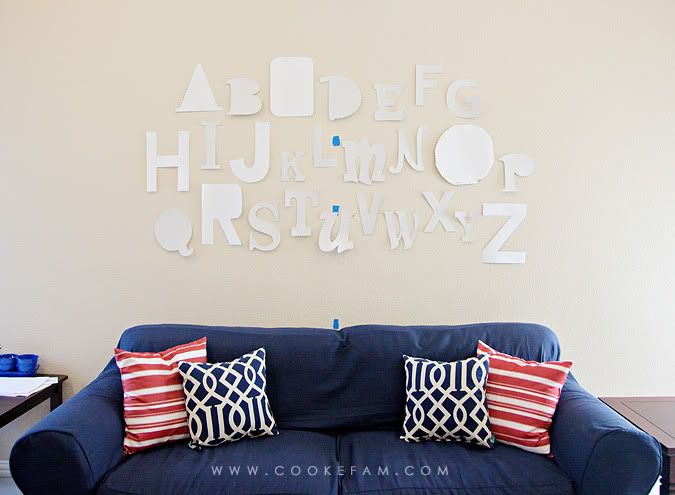
And then I did something crazy. I traced each letter on a piece of paper and cut it out. Yes, it did take a little bit of time, but I am so glad I took this extra step. It allowed me to recreate my arrangement on the wall and make any slight adjustments very, very easily. Then, I could step back and make sure that what I had laid out on the floor translated to the wall.
I measured and marked a center line above the couch with painter's tape so I could work from that to make sure the whole arrangement would be centered. Then, using a little bit of painter's tape on the back of each paper letter, I stuck the paper letters on the wall.

At this point, it took me a few days to complete all the letters...I did not do them all at once. Then, I laid out all of the letters (in several different arrangements) on the floor until I liked how it looked. This part actually took longer than it seemed like it would. After I was satisfied with the placement of each letter in the grouping, I took a photo of it so I could reference it, if necessary.
And then I did something crazy. I traced each letter on a piece of paper and cut it out. Yes, it did take a little bit of time, but I am so glad I took this extra step. It allowed me to recreate my arrangement on the wall and make any slight adjustments very, very easily. Then, I could step back and make sure that what I had laid out on the floor translated to the wall.
I measured and marked a center line above the couch with painter's tape so I could work from that to make sure the whole arrangement would be centered. Then, using a little bit of painter's tape on the back of each paper letter, I stuck the paper letters on the wall.
Then, to hang the real letters on the wall, I used Command strips so I wouldn't have a million (or 26) holes in my wall. Also, I knew if I messed up placing a letter, it would be easy to correct my mistake. When I hung each letter, I left the paper letter up there until the very last minute. I pulled it away just before attaching the real letter so I could get the placement as accurate as possible. As it turned out, I did not have to adjust any of the letters.
And I just have to show this last photo of my little assistant, who was right behind me taking photos with his camera when I was taking photos with mine. He's the cutest assistant I know.


5 comments:
Cute idea!
I wish I had a playroom! But then again, that's one more room I'd have to try to decorate and keep clean. :)
Wow - that did take some work! So wonderful to have such a sweet, dedicated, assistant!
It turned out GREAT Rach! I love it! (looks like Ethan does too!) ;)
I'm working on the alphabet for our nursery and I traced them all out too! I totally don't think you're crazy- how else are you supposed to get them up there right?
I LOVE THIS! I am going to do it in my playroom. Did you get all of the letters from those three stores then? I can't wait to do this project.
cms0301@hotmail.com
Post a Comment